The grid has gone down, and you have no heat! Luckily, there is the internet with loads of information about how to make a survival heater.
Oh, wait…
The internet isn’t exactly going to be working when the grid is down, so hopefully, you put these DIY emergency heater designs to memory now before you need them!
Better yet…
These DIY heaters are better than nothing and could save your life. But they are far from efficient. It’s much better to buy a proper heater in case of emergencies. I like emergency propane heaters or indoor kerosene heaters for prepping.
Important:
Whenever you burn something indoors, there is a risk of carbon monoxide (CO) poisoning. Many people get sick or die after natural disasters because they improperly use heaters indoors. While it seems counterintuitive to open a window or door when trying to heat a space, you must have ventilation to ensure CO gas isn’t building up.
Get a battery-operated carbon monoxide detector for your home and read this info on CO poisoning and heaters.
Metal Can, Alcohol and Toilet Paper Emergency Heater
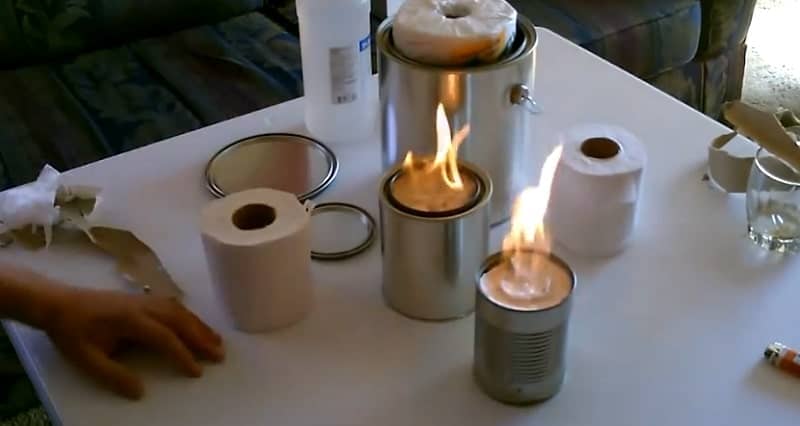
Here is one more reason to stockpile lots of toilet paper in your emergency supplies! This emergency heater is made of a tin can (large soup cans and gallon paint cans work well), toilet paper, and isopropyl alcohol. (Amazon Link)
Just put a roll of toilet paper into a tin can. Pour the alcohol over the toilet paper, so it is just saturated. Then light the alcohol on fire.
The alcohol is the fuel, and the toilet paper is like a wick in a candle.
The emergency heater can burn for over an hour and does an excellent job of heating the air. Because only the alcohol on top is on fire (where it touches the air), the bottom can stay cool.
You will need a few of these to heat a room.
Ventilation Requirements:
Alcohol burns very cleanly, so this emergency heater has little risk of CO poisoning. You’ll still want to crack a window. However, you won’t need a flue – keep the stove on a flat surface away from flammable items.
Terracotta (Flower Pot) and Tea Light Emergency Heater
You’ve probably seen this design for an emergency heater before. It is genius and can be used as supplemental heating in non-emergency situations too.
The traditional design for this DIY heater calls for:
- 4 tea lights (Amazon Link)
- 1 smaller terracotta flower pot
- 1 larger terracotta flower pot
- A metal pan + grill rack to set on top of it
- Small piece of aluminum foil
Instructions:
- Put the tea lights on the metal pan. Light them.
- Put the grill rack on top of the pan.
- Set the smaller flower pot on top of the grill rack; the flower pot should be upside down, so the open side is towards the tea lights.
- Use the aluminum foil to plug the drain hole on the smaller flower pot
- Set the larger flower pot on top of the smaller one (do not plug its drain hole)
The idea behind this emergency heater is that the smaller pot works as a convector to gather the heat from the tea lights, and the larger pot acts as a radiator.
The only real problem with the tea light-flower pot heater is that the tray can get hot.
You could try setting your tea lights on bricks instead and propping the ceramic pots up with more bricks.
Or, you can put in a little bit more effort and make the design shown in the video.
Rocket Stove
There are a bunch of ways to make rocket stoves. You can even make small ones out of coffee cans to use for off-grid cooking. If you want to heat with a rocket stove, you will need to have something much larger.
An old propane tank or beer keg will work great. The problem is you’ve got to be able to cut the metal tanks, which will be difficult in an emergency.
That is why I like this rocket stove design which is made from a 5-gallon bucket.
Ventilation Requirements: Rocket stoves make a lot of smoke. So, you will need to make a flue to funnel all of the smoke out. One solution is to use the rocket stove in your chimney. Or you can rig up an exhaust out your window, but then you will need to seal it off to prevent cold air from getting inside.
This video’s quality is bad, but the guy does a great job explaining how to build a rocket stove.
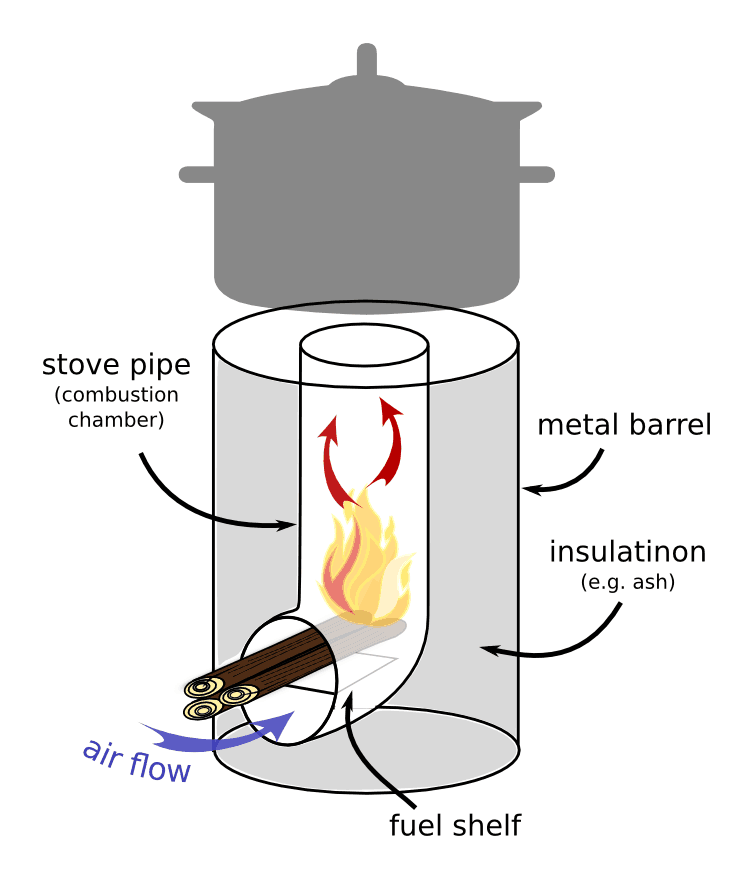
And here is a picture illustrating how a rocket stove works.

If you don’t have the time to make one, they are also available on Amazon – see here.
Paper Logs
So, you’ve got a rocket stove, wood-burning stove, or a fireplace; now you need something to burn.
Before you start hacking up your furniture for fuel, you should consider making paper logs.
First, you drill some holes in the bucket. Then, mix paper and water in a big bucket to make paper pulp.
Put something heavy on the pulp to drain the water out.
When it dries, you will have a big briquette made out of paper. It will burn for hours.
Ventilation Requirements: Depending on the type of paper you used to make the logs, it can burn pretty cleanly or make lots of sooty smoke. You’ll want a good flue to keep smoke from filling your home.
DIY Solar Heater from Tin Cans
This project is more intensive and not something you will probably need to rely on for short-term grid outages.
But, if you have a Bug Out retreat like a cabin, this project is worth considering.
The idea is to make a wall out of the tin cans. Cold air is drawn out of the home and goes through a heating panel (which is the columns of cans). The heated air is then returned to the home.
For this to work, you have to put them where there is a lot of sunlight. Install it in the room which has the most direct sunlight.
For this project, you will need the following:
Watch the video for the full instructions. Or you can find written instructions here.
Also, see best indoor stoves.
Have you ever tried making any of these DIY heaters? Let us know in the comments below.

